Chrome Extension Guide: Firebase Authentication with Email Links
Introduction to Firebase Authentication in Chrome Extensions
In this post, we’ll be exploring the process of setting up a Chrome extension project and integrating Firebase for email link authentication.
Table of Contents
- Introduction
- Setting up the Chrome Extension Project
- Overview of the Authentication Flow
- Detailed Authentication Flow
- Conclusion
Setting up the Chrome Extension Project
Let’s begin by setting up our Chrome extension project using crxjs and Vite. Follow the steps below:
- Create a Project: Initialize a new project using Vite 2 by running
npm init vite@^2.9.4. - Install CRXJS Vite Plugin: Install the CRXJS Vite plugin with
npm i @crxjs/vite-plugin@latest -D. - Update the Vite Config: Update your
vite.config.jsfile to include the crxjs plugin and the manifest file. Thevite.config.jsshould look like this:
   import { defineConfig } from "vite";
   import react from "@vitejs/plugin-react";
   import { crx } from "@crxjs/vite-plugin";
   import manifest from "./manifest.json";

   export default defineConfig({
     plugins: [react(), crx({ manifest })],
   });
- Create the Manifest File: Add a
manifest.jsonfile next to yourvite.config.jsfile with the necessary Chrome Extension’s properties. Here’s a simplemanifest.jsonstructure:
   {
     "manifest_version": 3,
     "name": "CRXJS React Vite Example",
     "version": "1.0.0",
     "action": { "default_popup": "index.html" },

     "background": {
       "service_worker": "src/background.js",
       "type": "module"
     },
     "permissions": ["tabs", "storage"]
   }
- Run the Development Build: Execute
npm run devto start the development build of your project.
For more detailed guidance, you can refer back to the original crxjs guide.
Authentication Flow
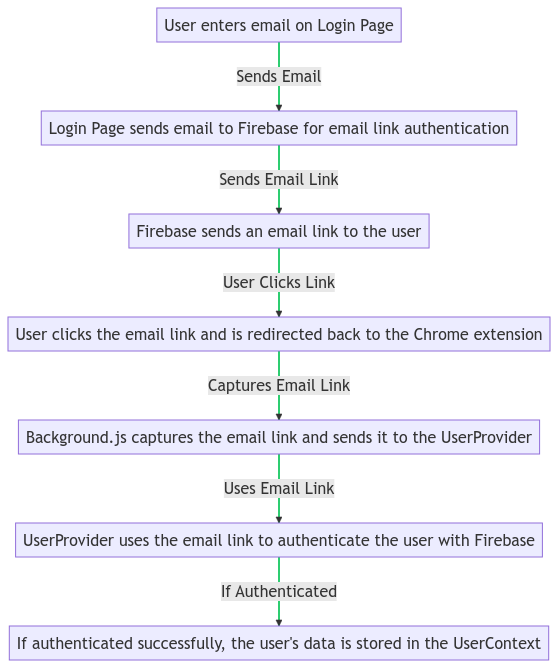
Here’s a simplified view of the email link authentication flow for a Firebase-enabled Chrome extension:
- User enters email on the Login Page.
- Firebase sends an email link to the user.
- User clicks the email link and is redirected back to the Chrome extension.
- The Chrome extension confirms authentication and grants the user access.
The following flow diagram represents this process:
Detailed Authentication Flow
Let’s break down these steps in detail.
Step 1: User Enters Email
This React component, LoginPage, collects the user’s email and sends a Firebase authentication link. The handleSubmit function sends the email link when the form is submitted. If the email link is successfully sent, a success message is displayed. If an error occurs, it’s logged to the console.
Here’s the code snippet for the LoginPage component:
import { useState } from 'react';
import { getAuth, sendSignInLinkToEmail } from "firebase/auth";
import styles from '../styles/LoginPage.module.css';

function LoginPage() {
  // ... component state and event handlers here ...

  return (
    <div className={styles.container}>
      {!isSuccess && (
        <form onSubmit={handleSubmit} className={styles.form}>
          {/* form elements here */}
        </form>
      )}
      {isSuccess && (
        <p className={styles.successMessage}>
          Login email successfully sent! Please check your email.
        </p>
      )}
    </div>
  );
}

export default LoginPage;
Check the complete version on GitHub repository for more details.
Step 2: Firebase Sends an Email Link
import { initializeApp } from "firebase/app";
import { getAuth } from "firebase/auth";

// Your web app's Firebase configuration
const firebaseConfig = {
  apiKey: import.meta.env.VITE_APP_FIREBASE_API_KEY,
  // ...other firebase configuration values...
};

// Initialize Firebase
const firebase = initializeApp(firebaseConfig);
const auth = getAuth(firebase);
export { auth };
export default firebase;
Check the complete version on GitHub repository for more details.
Step 3: User Clicks the Email Link
The background.js script captures the email link when the user is redirected back to the extension. It sends a message with the URL to the content script, notifying it of the URL change.
// background.js
chrome.runtime.onMessage.addListener((message, sender, sendResponse) => {
  // Handle "SET_EMAIL_FOR_SIGN_IN" message here...
});

chrome.tabs.onUpdated.addListener((tabId, changeInfo, tab) => {
  if (changeInfo.url) {
    // Check if URL is from the extension and handle authentication link...
  }
});
Check the complete version on GitHub repository for more details.
Step 4: Extension Confirms Authentication
The UserProvider component receives the email link and uses it to authenticate the user with Firebase. If authenticated successfully, the user’s data is stored in the UserContext.
// UserProvider.jsx
import { createContext, useState, useEffect } from "react";
import { auth } from "../firebase";
import { signInWithEmailLink } from "firebase/auth";

export const UserContext = createContext();

export const UserProvider = ({ children }) => {
  const [user, setUser] = useState(null);

  useEffect(() => {
    // Handle authentication state changes and messages from background.js...
  }, []);

  return (
    <UserContext.Provider value=>
      {children}
    </UserContext.Provider>
  );
};
Check the complete version on GitHub repository for more details.
Conclusion
Feel free to comment below if you have any thoughts or questions. Your input is highly appreciated!